# Build a Piano App using JavaScript
In this tutorial, we will be building a piano using HTML, CSS, and JavaScript. This will be a great article to learn about some new stuff, like the HTML audio attribute and how we can use it in JavaScript. But, to start building this project, we’ve to know some basics like,
- Basic HTML
- Basic CSS including CSS Flexbox
- Basic JavaScript
What will we learn in this tutorial?
- The HTML audio tag
- The Data attribute
- The `keydown` Event Listener
- Adding Classes using JavaScript
# 👲 The HTML Part
First, let's see the output of the piano.

[Here](https://nemo0.github.io/js-piano/) is the live version of it. Try it before jumping into the article.
As you can see, the piano will have different black and white keys. The white keys represent the seven notes of a piano(**A-B-C-D-E-F-G**), and the black keys will represent the sharp or flat notes. Also, for the background, we'll be using linear gradients. Our HTML is very simple. We'll have an individual `divs` for every piano key. Our piano consists of 12 keys. So, we will add twelve `div` wrapped into a parent `div`. Each `div` will have a unique `data` attribute. The `data` attributes will be used to map the `div` with their audio. Also, our piano keys will have styles according to the key type. The black keys will have an extra **class** `black`, and the white keys will have an extra **class** `white`. Other than that, all the `div` for the keys will have a class called `key`. And, all the keys will be finally wrapped into a `div` called `piano`.
Here's our HTML
```html
Piano
```
# 🎩 The data Attribute in JavaScript
The `data` attribute in HTML5 helps us to store some extra information without any extra work. Any attribute, whose attribute name starts with `data-` is a `data attribute`. So, for our piano, we are storing some extra data called `note` with the help of the `data` attribute in each of the `div`. For example, in the first div the `data-note="C"` stores a piece of information that this key will represent the **C** note in our piano. The data attributes can be easily targeted in JavaScript using the `dataset` keyword. We will discuss it more later in this article. To know more about the data attribute, visit the link [here](https://developer.mozilla.org/en-US/docs/Learn/HTML/Howto/Use_data_attributes).
# 🎄 Styling the Piano
The first step of styling an HTML page is to reset the default styles. Here also, we are resetting the **margin** and **padding** by targeting the global selector. We are also adding `box-sizing: border-box` because it'll help us to work with flexbox easily.
```css
* {
margin: 0;
padding: 0;
box-sizing: border-box;
}
```
For the background, we'll add a linear gradient. To speed up the process, I've used an online gradient generator called [CSS Gradient](https://cssgradient.io/). Here's our body.
```css
body {
background: #0f2027;
/* fallback for old browsers */
background: -webkit-linear-gradient(to bottom, #2c5364, #203a43, #0f2027);
/* Chrome 10-25, Safari 5.1-6 */
background: linear-gradient(to bottom, #2c5364, #203a43, #0f2027);
/* W3C, IE 10+/ Edge, Firefox 16+, Chrome 26+, Opera 12+, Safari 7+ */
}
```
Now, comes the tough part, styling the keys of the piano. First of all, let's add a **height** and a **width** for the piano. Because we'll be using flexbox, our flexbox will also be invoked here.
```css
.piano {
height: 100vh;
width: 100%;
display: flex;
justify-content: center;
}
```
## 🎹 Styling the White Keys
The first thing to style the keys is to give them a height and a width. Otherwise, our keys will not be visible at all. We'll also need a border for each element to separate one from the other.
```css
.white {
width: 9%;
min-width: 60px;
height: 70%;
background-color: white;
border: 1px solid #ccc;
}
```
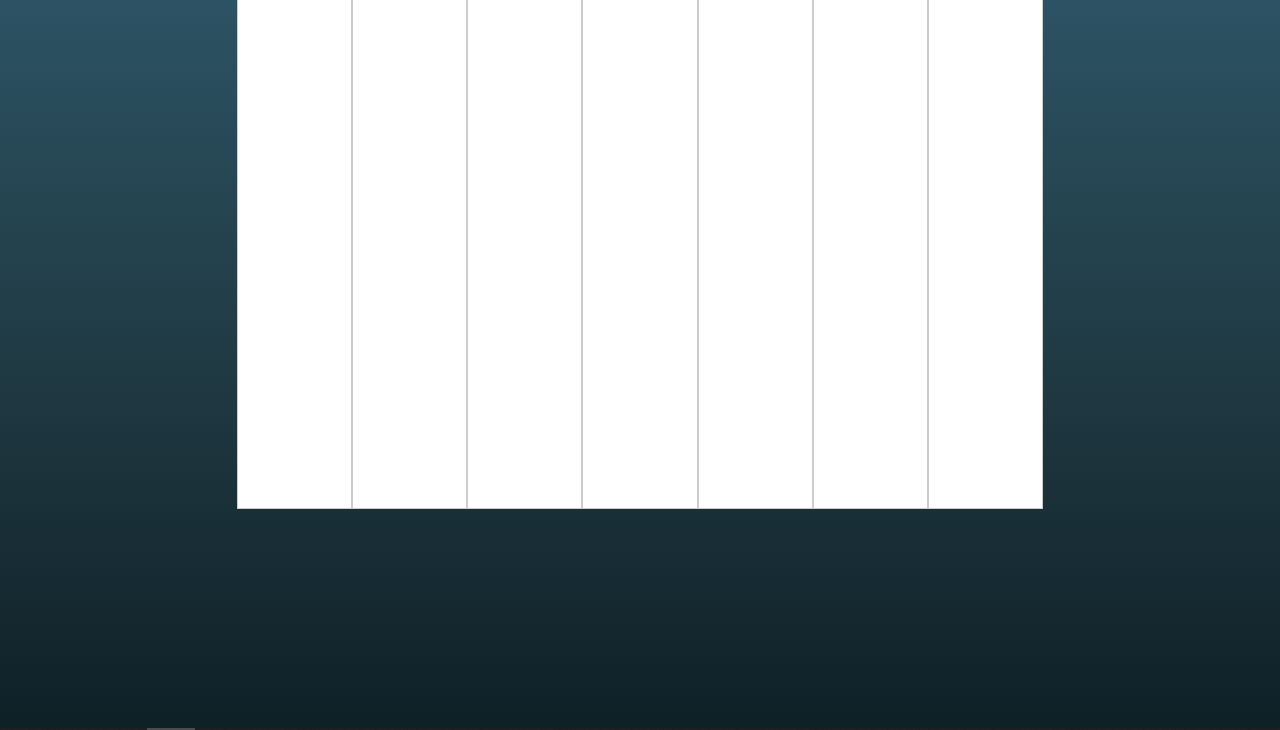
We are giving the white keys a width of **9% of the parent** and a height of **70% of the parent**. We are also adding a `min-height` property so that our keys don't become too small. Our white keys will have a **background color of white** and a **solid border of 1px**. The border color will be `#CCCCCC`, which is a darker shade of white. Here's the output of our piano until now,
## 🎹 Styling the Black Keys
The styling of the black keys is very similar to the white keys. The main difference is that the height of the black keys is smaller than the white keys.
```css
.black {
width: 8%;
height: 45%;
background-color: black;
}
```
We are giving it a width of **8% of the parent**, a **height of 45%** of the parent and background color of **black**.
Here's the output after adding the black keys,

This doesn't look like the one we want. How do we bring the black keys on top of the white ones? The easiest idea is to add some negative margins. Because our black keys have a width of 8%, we need to distribute it equally on two white keys. For that, we’ll add a -4% of left margin and a -4% of the right margin. We’ll also need to add a z-index to bring it forward. So, our complete style for the black keys will look like this,
```css
.black {
width: 8%;
height: 45%;
margin-left: -4%;
margin-right: -4%;
z-index: 2;
background-color: black;
}
```
Now our piano will look similar to the one we wanted.
# 🎵 The Audio Tag
We have not added one important portion in our HTML document till now. We need to add `audio` tags for each key into the HTML element.
The HTML `audio` tag is used to embed sound into webpages. The `src` attribute into the `audio` tag will represent the source of the audio. In the Github [repo](https://github.com/nemo0/js-piano) of this project, you will see that we have a folder called **notes**, inside the notes folder, we have all the **mp3 sounds** of the individual keys that we are going to use for this tutorial. Our audio `src` attribute will refer to the location of these sources. Each of the `audio` tag will also have a unique `ID` to determine the individual keys. Here's the remaining HTML part:
```markup
```
Our notes folder has more notes. But for this tutorial, we are only using standard piano keys(C4 to B4).
# 🧵 Putting the Parts together with JavaScript
Now comes the most important part - JavaScript. We'll start by selecting few elements of the DOM. These elements will be used to manipulate our piano. First of all, we'll need to select all the keys that are available to us. All the keys have a class of `key`, so targeting the key class will do the job.
```javascript
const keys = document.querySelectorAll('.key');
```
We would also need to target the regulars and the sharp keys. As you know, our regulars have a `white` class and the sharps have a `black` class. Let's target them now.
```javascript
const regulars = document.querySelectorAll('.key.white');
const sharps = document.querySelectorAll('.key.black');
```
Now that we have selected the elements, the next thing we will do is to add a function to each of the keys.
```javascript
keys.forEach((key) => {
key.addEventListener('click', () => playNote(key));
});
```
Here, we are binding a function with the `click` event. For each click, the `playNote` function will be executed. The `playNote` function takes a single parameter ‘`key`’, which is the audio of that key. We are using [arrow functions](https://www.studytonight.com/javascript/javascript-arrow-function) here.
Let's move to write the `playNote` function.
Our function takes a single parameter and that is the key that is pressed. The first thing when writing our function is to identify which key is pressed. How do we do so? Here comes the `data` attribute in use. At the `playNote` function call, we are passing the `key `parameter. The `key` parameter is nothing but the `div `which is clicked. So, to start with our function, let's first select the note that is pressed.
```javascript
let playNote = (key) => {
const noteSound = document.getElementById(key.dataset.note);
console.log(noteSound);
};
```
To access the `data` attribute, we use the `dataset` keyword in JavaScript. If we console log the `noteSound` constant, we will see that it is returning the `audio` attribute depending on the key that is pressed. Our piano maps the audio id with the `data-note` attribute of the key to play the correct audio. To play the audio now, we'll use the play method.
```javascript
let playNote = (key) => {
const noteSound = document.getElementById(key.dataset.note);
noteSound.play();
};
```
Our piano is almost ready. But we can add a few modifications. If you press single key multiple times now, it’ll not play until the audio sound ends completely. We don't want it. We want to play the audio every time the key is clicked. To do so, we have to set the current time to zero each time the key is clicked. Another modification we can do here is to add a class to make it visible which key is pressed. For that, we have to add two classes to our CSS file. One is to show the active white key and another one is to show the active black key. We will just change the background color of the keys.
```css
.white.active {
background-color: #ccc;
}
.black.active {
background-color: #333;
}
```
As you can see, the `.white.active` class has a darker white background and the `.black.active` class has lighter black color. To add the colors when keys are pressed, we'll use the `classList.add` method available in JavaScript.
```javascript
let playNote = (key) => {
const noteSound = document.getElementById(key.dataset.note);
noteSound.currentTime = 0;
noteSound.play();
key.classList.add('active');
noteSound.addEventListener('ended', () => {
key.classList.remove('active');
});
};
```
We are adding the class using the `key.classList.add('active')` method to a key whenever the key is pressed. And we are removing the class when the audio is completely played. For this, we are listening to an event called ‘`ended`’ and whenever this event is triggered, we are removing the class using `key.classList.remove(‘active’)` method.
And we are done building the piano.
# 🎈 Building the Piano Computer Keyboard Friendly
But, we can stretch our piano further. How about playing our piano using the keyboard? Sounds awesome right? Let's just jump into building it our computer keyboard friendly!
First of all, we have to choose which keys to use. I think the middle layer of the keyboard, i.e., the line of keys with the Caps Lock button is perfect for it, because it has keys in the middle of it above it, just like an original piano. So, we can use the keys from **A** to **J** for the regular keys, and keys from **W** to **Y** for the sharps.
We will start by adding some CSS to help our users understand which key to press. Inside all the divs, we will add the corresponding keyboard key. So, now our HTML of divs will look like this now,
```html
A
W
S
E
D
F
R
G
T
H
Y
J
```
In the CSS part, we will style the ‘`key`’ class. The color of the text will be updated in the white and black classes because the colors will be different for the key types. We will use flexbox to position the text. Here’s our complete styling,
```css
* {
margin: 0;
padding: 0;
box-sizing: border-box;
}
body {
background: #0f2027;
/* fallback for old browsers */
background: -webkit-linear-gradient(to bottom, #2c5364, #203a43, #0f2027);
/* Chrome 10-25, Safari 5.1-6 */
background: linear-gradient(to bottom, #2c5364, #203a43, #0f2027);
/* W3C, IE 10+/ Edge, Firefox 16+, Chrome 26+, Opera 12+, Safari 7+ */
}
.piano {
height: 100vh;
width: 100%;
display: flex;
justify-content: center;
}
.key {
display: flex;
justify-content: center;
align-items: flex-end;
font-size: 1.2rem;
font-weight: bold;
padding-bottom: 20px;
}
.white {
width: 9%;
min-width: 60px;
height: 70%;
background-color: white;
border: 1px solid #ccc;
color: #000;
}
.black {
width: 8%;
height: 45%;
margin-left: -4%;
margin-right: -4%;
z-index: 2;
background-color: black;
color: #fff;
}
.white.active {
background-color: #ccc;
}
.black.active {
background-color: #333;
}
```
Now, let’s jump back to JavaScript again. We will create two arrays. These arrays will represent the keys. Check the arrays below, and you’ll get an idea.
```javascript
const whites = ['a', 's', 'd', 'f', 'g', 'h', 'j'];
const blacks = ['w', 'e', 'r', 't', 'y'];
```
The regular keys will be accessed through the keys **a to j**, and the sharps will be accessed through the keys **w to y**.
Now comes the most important section, the logic part. When a key is pressed, a `keydown` event is triggered. We will use this event to play audio.
```javascript
document.addEventListener('keydown', (e) => {
if (e.repeat) return;
const key = e.key;
const whiteKeyIndex = whites.indexOf(key);
const blackKeyIndex = blacks.indexOf(key);
if (whiteKeyIndex > -1) playNote(regulars[whiteKeyIndex]);
if (blackKeyIndex > -1) playNote(sharps[blackKeyIndex]);
});
```
We are adding an event listener to listen to the `keydown` event. When the event is observed, we pass in a parameter inside the event listener function. To get the key that is pressed, we will use the `e.key` method. The `e.key` method will return the key that is pressed. Now, we’ll get the index of the key and will store it inside a variable. To store the white key index, we are using a variable called `whiteKeyIndex` and for the black key index, we’ll use a `blackKeyIndex` variable. To get the index, we’ll use the` indexOf `method. Inside the array of whites or blacks, we are checking the index of the key that is pressed using the `indexOf `method. Now that we know the index of the key that is pressed, we will write a condition. The condition is, if a white key is found(-1 means not found, any value larger than it means that the key is found), the `playNote `function will be invoked. And, inside the `playNote` function, we’ll pass in the key by locating it in the array with `regulars[whiteKeyIndex]`. We are doing the same step for the black keys also. Please keep in mind, because we are using the array to locate the key, our array should be in the exact order in which we want our piano keys to be set up.
The only thing that is left in our code is that, if you hold a key, the audio will sound ridiculous. Because, when a key is held, the `keydown `event gets triggered after every few seconds. To stop this behavior, we’ll check if the key is held down. If it is, then we’ll simply return the function. Returning the function will not execute any code. And this is done by `if (e.repeat) return` line. And we are done. Our piano is ready.
To check the complete source code, visit the GitHub repo [here](https://github.com/nemo0/js-piano).
# 🖼 Conclusion
I hope you enjoyed building this piano. To get such more tutorials, keep visiting [nemo.hashnode.dev](https://nemo.hashnode.dev). Here is another simple JavaScript tutorial about building a [covid 19 tracker](https://nemo.hashnode.dev/create-a-javascript-covid-19-tracker-ckpm90f3d0qpyz0s177p25aft).