# Build a Tic Tac Toe Game with JavaScript
This article is going to be a fun one. In this article, we'll be building a **Tic Tac Toe game** just by using HTML, CSS, and JavaScript. This is going to be an easy one. Both the inputs have to be placed by the user. But in another article, we will be covering a self-completing Tic Tac Toe game where the user will feel like he is playing with a real person. Before we jump into a tougher one, let's strengthen our base by building this one.

**What Will We Learn?**
- How to add CSS Variables
- How to add CSS styles using JavaScript
- Real-life use of the `forEach` function
The first step to start building our game is to build the markup. The markup styles are very basic. We will also not be focusing much on the CSS part because our main target from this article is to understand the JavaScript concepts behind it.
## Tic Tac Toe Game - HTML Code:
I will not be discussing each markup style here.
```html
Tic Tac Toe
Play
```
As you can see, we are integrating the **styles.css** file and **a google font** at the head section. We are also adding the script file with the `defer` keyword so that the javascript loads after the HTML completes loading. We are using two headings that will show when a player wins a game and using which combination he/she won. After the heading, we are adding a **restart button** that will restart the board. The cells of a Tic Tac Toe are built using nine `div` tags. All the `div` tags are grouped into a single `div` tag **with id board**. We are also assigning an ID to each of the cells. We are using **0** based indexing here. You will understand the reason when we jump to the JavaScript section. So, this is it with our HTML. Now, let's jump to the CSS Part.
## Tic Tac Toe Game - CSS Code
Before we start writing any CSS code, you have to know about CSS `custom property`. CSS3 provides us the ability to declare custom properties and use them at multiple places in the CSS file. Any name starting with two hyphens(`--`) will be counted as a `custom property` in CSS. We can assign a value on the right-hand side of a custom property. It is like declaring variables and using their values at places. All the custom properties are declared in the `root` selector. For example,
```css
:root {
--text: #dbdfac;
--bg: #2a1e5c;
--btn-bg: #d7f171;
}
```
We are declaring all the custom properties here. You can see that all the properties start with two hyphens in front of them. Now to use these variables in our CSS file, we use the `var()` function to use them. See the snippet below to understand it.
```css
h4 {
color: var(--text);
background-color: var(--bg);
}
```
You can see that we are **passing the variable name** inside the `var` function. Using this style, we can use CSS variables.
Now that you have understood what are CSS custom properties and how to use them, le's start styling the page.
```css
:root {
--text: #dbdfac;
--bg: #2a1e5c;
--btn-bg: #d7f171;
}
* {
margin: 0;
padding: 0;
box-sizing: border-box;
}
```
As you can see from the above code, we are first declaring the colors in the `root` selector. We are also resetting the `margin` and `padding` of our document. After declaring the variables, we are using the `box-sizing: border-box` property in our universal selector. The `border-box` property helps us when working with boxes in CSS. It prevents the horizontal and vertical scrollbars. After we are done with resetting our document, we will move to style the rest of the document.
We are using a google font of **Nerko One** as you may have noticed before. Our next target is to style the body of the document. The styling is very simple. We will just add a **background-color**, a **text color**, and a **font-family** in this section.
```css
body {
color: var(--text);
background-color: var(--bg);
font-family: 'Nerko One', cursive;
}
```
We are using our custom CSS properties here for the colors of the text and background color.
The next thing that we are going to style is the first heading. I will just paste the styles below and you will get an idea about what they do.
```css
h1 {
font-size: 80px;
margin-bottom: 0;
text-transform: uppercase;
}
```
The `text-transform:uppercase` property will convert the text into uppercase characters. Let's jump to the container section now. The container section holds all the text, buttons and divs of our document.
```css
.container {
height: 100vh;
width: 100vw;
display: flex;
justify-content: center;
align-items: center;
flex-direction: column;
}
```
We are giving the container a height and a width of `100vh` and `100vw` respectively so that the container **covers the complete viewport height and width**. Then, to center everything inside it, we are using CSS flexbox. The `display:flex` will invoke the flexbox. The `justify-content:center`, and `align-items:center` will center all the elements horizontally and vertically in the viewport.
But, after applying up to this style, you'll find that all the elements are set up aligned with the horizontal line. To correct it, the `flex-direction: column` property is used. It will align the items along the column.
The next element that we have to style is the **board ID**. The board ID consists of all the boxes inside it. Our strategy here to **position only three boxes in a row** is to give the board ID a width. Whenever the boxes reach the width, it’ll wrap the next boxes in a new line. The width of the board will be divided by three to get the width required by each box.
```css
#board {
width: 60vw;
display: flex;
flex-wrap: wrap;
font-size: 100px;
margin-top: 40px;
}
```
As you can see, we are giving the board, a **width of 60 viewport**. We are using `display: flex` and `flex-wrap: wrap` so that the boxes wrap after reaching the width. We are also giving a font-size and a margin for the top here.
Now comes the interesting part - *the boxes*. As I have just told you, we have to divide the total width of the board by three. So, dividing 60 by 3 will give us 20. This 20 will be the height and width of each box of our board. We are also specifying the height because otherwise, it'll look odd.
```css
.box {
height: 20vh;
width: 20vw;
display: flex;
justify-content: center;
align-items: center;
color: var(--text);
}
```
Here are the styles. Pretty similar to the container styles. I hope you get it. I know you can't see any output on the screen. For the lines, we will use JavaScript because it'll take less amount of time. The only thing that is left in styling our document is the restart button. I am not adding any hover effect or complicated styles. You can always edit and add your styles.
```css
#restart {
padding: 10px 20px;
background-color: var(--btn-bg);
border: none;
border-radius: 20px;
color: var(--bg);
font-size: 20px;
font-weight: bold;
cursor: pointer;
text-transform: uppercase;
}
```
I hope you understand what the above styles do. We have completed our CSS stylings. Now let's jump to the most important part of our game, the JavaScript section.
## Tic Tac Toe Game - JavaScript Code
The first thing about writing our JavaScript file is to access the DOM elements in JavaScript. We will need a few things that will be manipulated in the game. Let's access the DOM.
```javascript
const boxes = document.querySelectorAll('.box');
const text = document.querySelector('#heading');
const strategy = document.querySelector('#strategy');
const restartBtn = document.querySelector('#restart');
```
These four elements will be manipulated in our JavaScript. Now, let's move on to building our Tic Tac Toe board. Our aim to build the board is to add borders to the boxes. Now, which box should have which border? We will implement it using some logic.
In the first line of the above code, you can see that we are using the `querySelectorAll` property to access all the boxes. The `querySelectorAll` property returns an array of the elements. We will loop through each of the elements in the array and depending on some conditions we will add the borders to it. As you know, array indexes are zero-based. We will be creating a function that draws the board.
Let's call the function `drawBoard`. This function will not take any argument. It will **add a bottom border** to the elements whose **indexes are less than 3**. A **right border will be added** to those elements which are **completely divisible by 3**(index position 3, 6). The function will **add a left border** to those elements which **give a modulus of 2**(index position 2, 5, 8) and a **top border will be added** to all the elements that have an **index position greater than 5**. Now, if you look closely at the logic, you'll find that all of our required borders are covered using this theory. As I have mentioned earlier, we are going to create a function that will loop through each of the array elements. For this example, we will be using the `forEach` loop. We are using a `forEach` loop because while using a `forEach` loop to loop through an array, we can add a callback function to the loop. It can take three parameters. The first parameter is the current value, which is a required parameter, the second and third ones are the index and array.
```javascript
const drawBoard = () => {
boxes.forEach((box, i) => {
let styleString = '';
if (i < 3) {
styleString += 'border-bottom: 3px solid var(--text);';
}
if (i % 3 === 0) {
styleString += 'border-right: 3px solid var(--text);';
}
if (i % 3 === 2) {
styleString += 'border-left: 3px solid var(--text);';
}
if (i > 5) {
styleString += 'border-top: 3px solid var(--text);';
}
box.style = styleString;
box.addEventListener('click', boxClicked);
});
};
```
In our loop, we are passing the current value using the box parameter and the index using the `i` parameter. After each iteration, we are resetting the value of a variable called `styleString`. This `styleString` variable will be used to add the CSS styles. You can see that we are using some if conditions to check our logic. Depending on the logic, we are adding borders. The styles are stored inside the `styleString` variable. And after a box meets a condition, the CSS style is added using the `box.style` method. The `style` method in JavaScript is used to add CSS styles from JavaScript. Now, after calling your function if you reload your document, you will find that our board now looks like a tic tac toe board. We also have to **add an event listener for the boxes**. So, we will add `box.addEventListener('click', boxClicked);` this line before our `forEach` loop closes. We are listening to a `click` event and whenever the event is listened to, we call the `boxClicked` function. We will be creating this function now.
Before moving to build the `boxClicked` event, we have to define a few more variables on the top of our script file.
```javascript
const spaces = [];
const tick_circle = 'O';
const tick_x = 'X';
let currentPlayer = tick_circle;
```
Here are the rest of the variables that we need now. The `spaces` variable is an empty array. You'll understand why we are declaring it in a little bit. Tic Tac Toe usually has an `X` and an `O` for playing. We are defining those two inside two separate variables. And a variable called `currentPlayer` that sets the `currentPlayer` to `O` at the start of a game.
Now, let's jump into building our `boxClicked` function. The `boxClicked` function will take the event as an argument. Let me first paste the code for you, then I'll explain it.
```javascript
const boxClicked = (e) => {
const id = e.target.id;
if (!spaces[id]) {
spaces[id] = currentPlayer;
e.target.innerText = currentPlayer;
if (playerWon()) {
text.innerText = `${currentPlayer} has won!`;
restart();
return;
}
if (playerDraw()) {
return;
}
currentPlayer = currentPlayer === tick_circle ? tick_x : tick_circle;
}
};
```
So, first of all, we are assigning a variable called `id`, which will store the ID of the clicked box. The `event.target.id` gives us the ID of the `div`.
Then we are checking if the box is already filled. The `!spaces[id]` checks if the position is empty. And if it returns `true`, which means that the **position is empty**.
After finding that the position is empty, we assign the `currentPlayer` value to space. And then, inside the box, we assign the `currentPlayer` icon which can be "X" or "O". Once this condition is done, we check for another. This time we pass a function called `playerWon` inside the `if` statement, if the function returns `true` then we change the heading `innerText` depending on which player has won.
Then we call another function to restart our board. The `return` statement will take us out of the condition. Similarly, we also check depending on another function called `playeDraw`. In the last line of this function, we are just changing the `currentPlayer` icon depending on the last icon. It is checking if the `currentPlayer` icon is the circle, then we change it to "X", otherwise "O".
Let's now build the `playerWon` function. I have shown all the possible winning conditions in a Tic Tac Toe board.


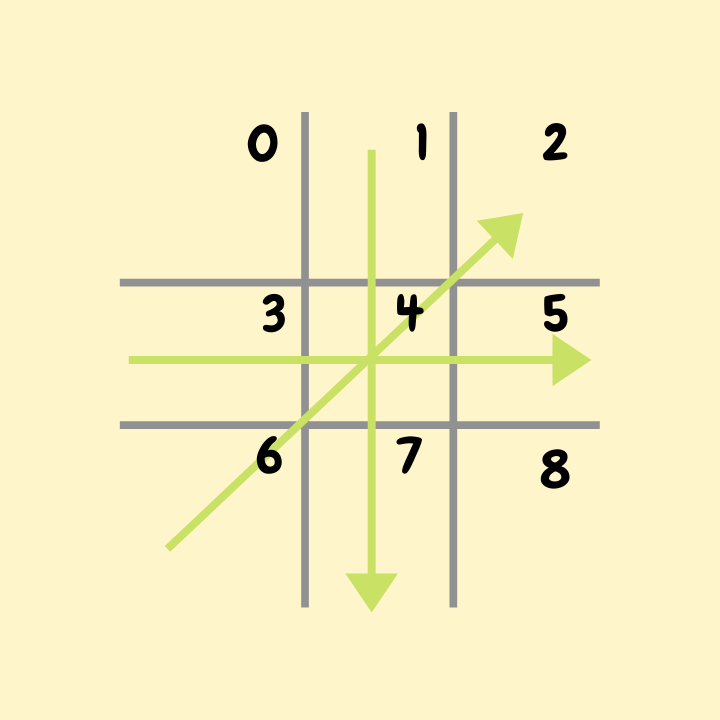
We will be using these combinations to check if the player has won. So, for the first image our 0th index becomes constant. Then we can check if the player is also on index
- 0, 1 and 2
- 0, 3 and 6
- 0, 4 and 8
For the second image, the index position 8 becomes constant and the possible combinations will be
- 2,5 and 8
- 6, 7 and 8
- 0, 4 and 8 is already covered
And finally, for the index position 4, the combinations are
- 2, 4 and 6
- 1, 4 and 7
- 3, 4 and 5
Let's see the function now.
```javascript
const playerWon = () => {
if (spaces[0] === currentPlayer) {
if (spaces[1] === currentPlayer && spaces[2] === currentPlayer) {
strategy.innerText = `${currentPlayer} wins up to top`;
return true;
}
if (spaces[3] === currentPlayer && spaces[6] === currentPlayer) {
strategy.innerText = `${currentPlayer} wins on the left`;
return true;
}
if (spaces[4] === currentPlayer && spaces[8] === currentPlayer) {
strategy.innerText = `${currentPlayer} wins diagonally`;
return true;
}
}
if (spaces[8] === currentPlayer) {
if (spaces[2] === currentPlayer && spaces[5] === currentPlayer) {
strategy.innerText = `${currentPlayer} wins on the right`;
return true;
}
if (spaces[6] === currentPlayer && spaces[7] === currentPlayer) {
strategy.innerText = `${currentPlayer} wins on the bottom`;
return true;
}
}
if (spaces[4] === currentPlayer) {
if (spaces[1] === currentPlayer && spaces[7] === currentPlayer) {
strategy.innerText = `${currentPlayer} wins vertically on middle`;
return true;
}
if (spaces[3] === currentPlayer && spaces[5] === currentPlayer) {
strategy.innerText = `${currentPlayer} wins horizontally on the middle`;
return true;
}
if (spaces[2] === currentPlayer && spaces[6] === currentPlayer) {
strategy.innerText = `${currentPlayer} wins diagonally`;
return true;
}
}
};
```
As you can see, we are checking each of the conditions that I mentioned before. If a condition satisfies, then **we are setting the H2 value** with the condition by which a game is won and finally we are returning **true**. The` return true` value is important. Because, if you see the `boxClicked` function, we wait for the return value in our conditional statement.
Now let's create the `draw` function. The `draw` function that we are using here is very simple. If all the boxes are filled and no winning condition satisfies, then only we say that the match is drawn. I am using a different approach for this function. I am using a variable that will increment after each box is clicked. Because we have 8 boxes in total, if the counter becomes equal to 8, then we say that the match is drawn.
```javascript
const playerDraw = () => {
let draw = 0;
spaces.forEach((space, i) => {
if (spaces[i] !== null) draw++;
});
if (draw === 9) {
text.innerText = `Draw`;
restart();
}
};
```
I think I don't have to explain any further here. The only thing that is left to our code now, is the `restart` function.
```javascript
const restart = () => {
setTimeout(() => {
spaces.forEach((space, i) => {
spaces[i] = null;
});
boxes.forEach((box) => {
box.innerText = '';
});
text.innerText = `Play`;
strategy.innerText = ``;
}, 1000);
};
```
Here is our `restart` function. I am wrapping all the code inside the function into a `setTimeout` method. The `setTimeout` function waits for a defined amount of time and then executes whatever function is created inside it. So, how do we restart our board? We assign all the spaces with a `null` value. This is done using a `forEach` loop here. You can also use a `for` or `for-of` loop. The next thing is to change all the box values to blank. This is also done using a `forEach` loop. And finally, we are changing the `h1` and `h4` text. The `1000` at the end will make sure that this function executes after one second.
We will add this `restart` function to the restart button also. The only downside is that it'll even after clicking the restart button, it'll execute after a second. This can be solved by using the `setTimeout` function individually to the restart function. But I won't be doing so here.
```javascript
restartBtn.addEventListener('click', restart);
restart();
drawBoard();
```
After adding the function to a click event listener in the `restart` button, we are done. Finally, we are just calling the created functions.
* [Codepen](https://codepen.io/nemo011/pen/vYmmKjg)
The complete code is also available on this *Github [repo](https://github.com/nemo0/tic-tac-toe)*.
# Conclusion
The approach for this can be multiple. We can also create a complete array of possible combinations and then loop through and check if it satisfies any. You can also try to implement your logic for this game. In another article, we will be building a tic tac toe game that will give us an experience of playing against the computer.
If you liked this article or you have any suggestions, please leave a comment below.
Also checkout:
- **[Creating a Piano using JavaScript](https://nemotivity.dev/build-a-piano-app-using-javascript-ckpqfnqsg0ds5xis1eo5id8hd)**
- **[Build a Weather App with JavaScript](https://nemotivity.dev/build-a-weather-app-with-javascript-ckqcc7foq02opd6s1gj7l8039)**